How-To Guides
Price Bands
Price Bands
How to configure time-sensitive pricing.
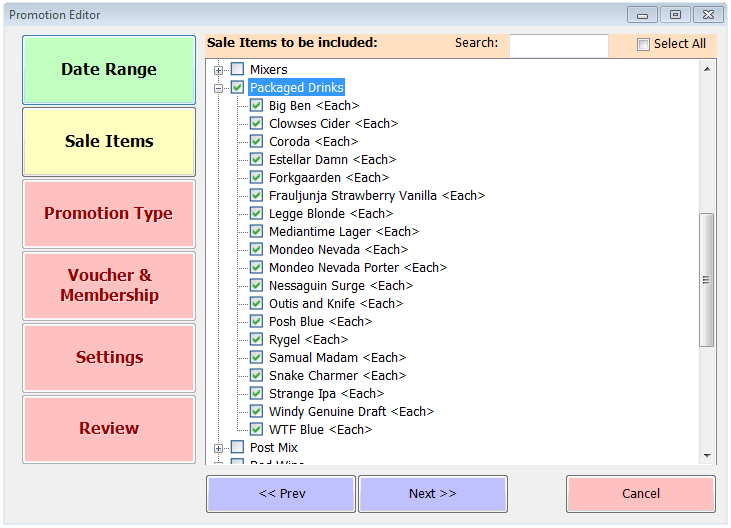
Once the date range has been set as indicated on the main How To: Promotions page, clicking ‘Next >>’ brings you to the item selection screen as shown below.

All categories are listed and can be expanded to show every current sale item within those categories, including any which may not be displayed on your tills because they’re discontinued products or simply have had the button removed from your current layout. At the top of the screen you’ll see a search box which can save you time if you know the name of the item you’re looking to include in the promotion.
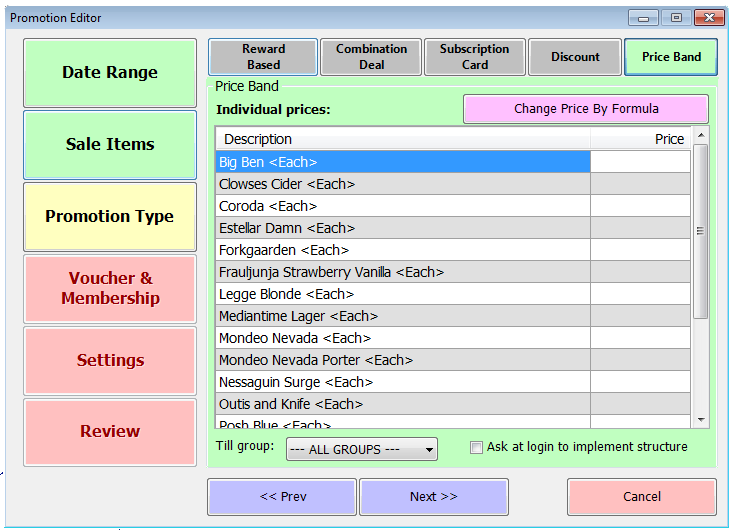
Once you’ve identified and ticked the items to which this offer will apply, clicking ‘Next >>’ again will take you to the Promotion Type screen. Click the Price Band button at the top and the screen will change to display all the selected items with a space for the price to be charged under this price band.

Each item in the promotion needs to have a price specified. These can be entered one by one manually. Click in the top price box, enter the relevant price and then press enter. Repeat until the last item.
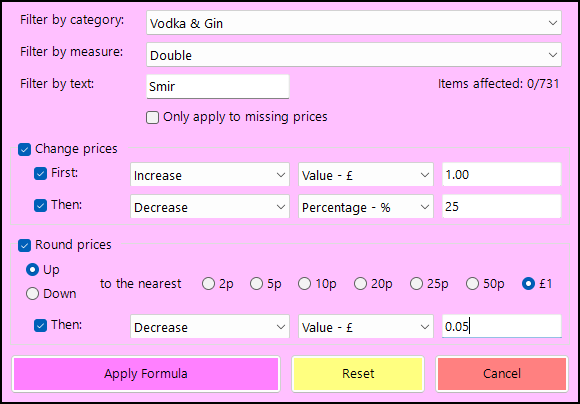
Entering prices individually can be time consuming so there is an alternative. If you click the ‘Change Price by Formula’ button you’ll see a pop-up like this;

This allows you to set a formula based on the normal price of each item. The example above makes use of all available options for illustration purposes only. In reality it is only necessary to use at most 3 steps. Some common combinations are listed below;
You can use the top boxes to filter by category, size and name. In the example above, any item in the Vodka & Gin category that comes in a double measure and has the text ‘Smir’ in its name will be affected (and only those items) when the ‘Apply Formula’ button is pressed. You can repeat this process with different criteria, and the tick-box ‘Only apply to missing prices’ is useful to prevent accidental overwriting of previously set prices. At the bottom, the ‘Reset’ button will remove any filters and settings and let you start again.
When you have set the criteria click on ‘Apply Formula’. You will then be returned to the list of items and the new prices will be listed against them. At this point you can still alter individual prices manually if there are any items where your formula isn’t generating the correct price, or you can apply a different formula to any items not yet set.
Underneath the list of new prices there are two further options. As with all promotions you can select to apply to individual till groups. In addition, there’s an option to ‘Ask at login to implement structure’. If this is ticked then each time a user logs in to the till to begin a transaction while the price band is in effect they’ll be asked whether to use the pricing structure it offers. If they select no then normal pricing will apply for that transaction. This option is commonly used for preferential pricing for members or regulars.
The remainder of the configuration of a price band is identical to other types of promotion, as described on the main How-To: Promotions page and the How-To: Voucher Promotions page (although price bands can’t be set to require vouchers they can be linked to membership).